Ben’s Electric Cargo Bike
This page is dedicated to my electric cargo bike. I’ve always loved biking and I generally hate driving (at least when there are other people on the road ;-). Even if I take the same amount of time or even longer to bike, I enjoy it more.
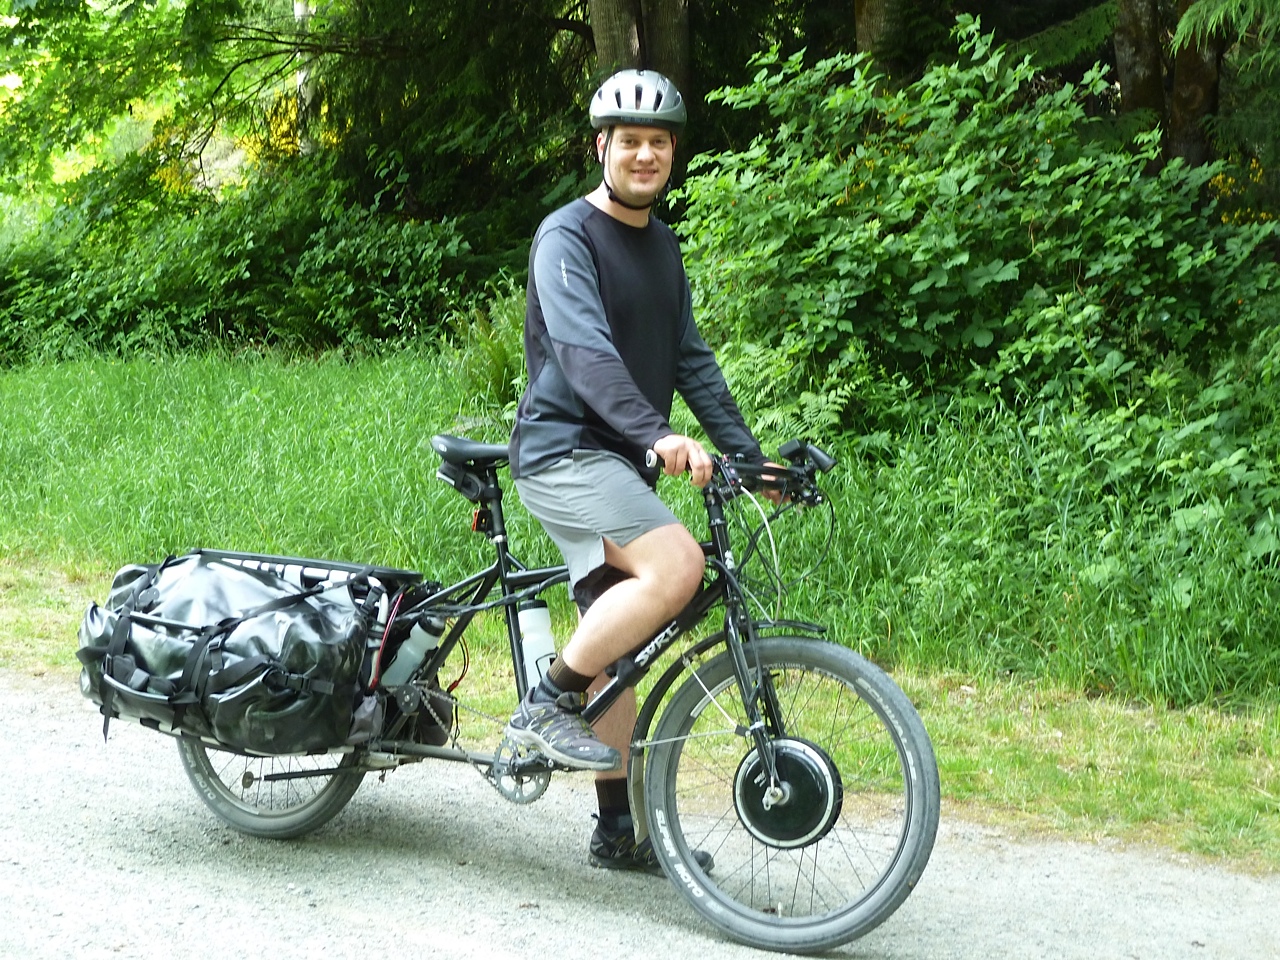
I also love camping and hiking and would like to bike a few FSR trails this summer (forest service roads). I just recently took this bike on a 320km trip from my house in Langley, BC to Sooke on Vancouver Island (Sooke Potholes actually). Lots of fun and no problem to bring >60lbs of camping gear.
So this page will feature all the cool things I’ve done to make my bike exactly the way I want it. It seems all of us bike lovers really enjoy seeing what each person has done. I for one have taken much inspiration from other “Big Dummies” active in the bicycle community.
Build Overview
Frame
I went for the Big Dummy 2011 frame. The Big Dummy seems to have held it place as the top cargo bike frame over last several years. While both cheaper cargo bikes and stronger cargo bikes have emerged, none have yet beat the Big Dummy in terms of performance and compatibility.
I happen to like the new straight top tube better than the curvy top tube of previous years’ models. I like having a triangle frame bag on my bikes which fit nicely in a traditional triangle shape. While I really liked the OD frame color of past years’ models, I also like the black color equally.
Other reasons I went with the 2011 Big Dummy include:
- Native XtraCycle compatibility. (I like the ability to remove/replace add-ons as I please vs. some of the fixed designs released more recently.)
- Rohloff OEM2 torque arm support built into dropout design.
- I liked the TerraCycle chain management setup available for the Big Dummy or Free Radical only.
- I wanted a solid kickstand and liked the “Rolling Jackass Centerstand” made by Val Kleitz.
Headset - Cane Creek
I got a wicked deal on a Cane Creek 110 Headset from Chain Reaction Cycles. The headset is very beefy for standard 1-1/8 threadless. I like this as I do like to put a lot of stress on my bike between the electric front wheel, my weight + cargo, and a little casual off road biking. This headset is guaranteed for 110 years! ;-)
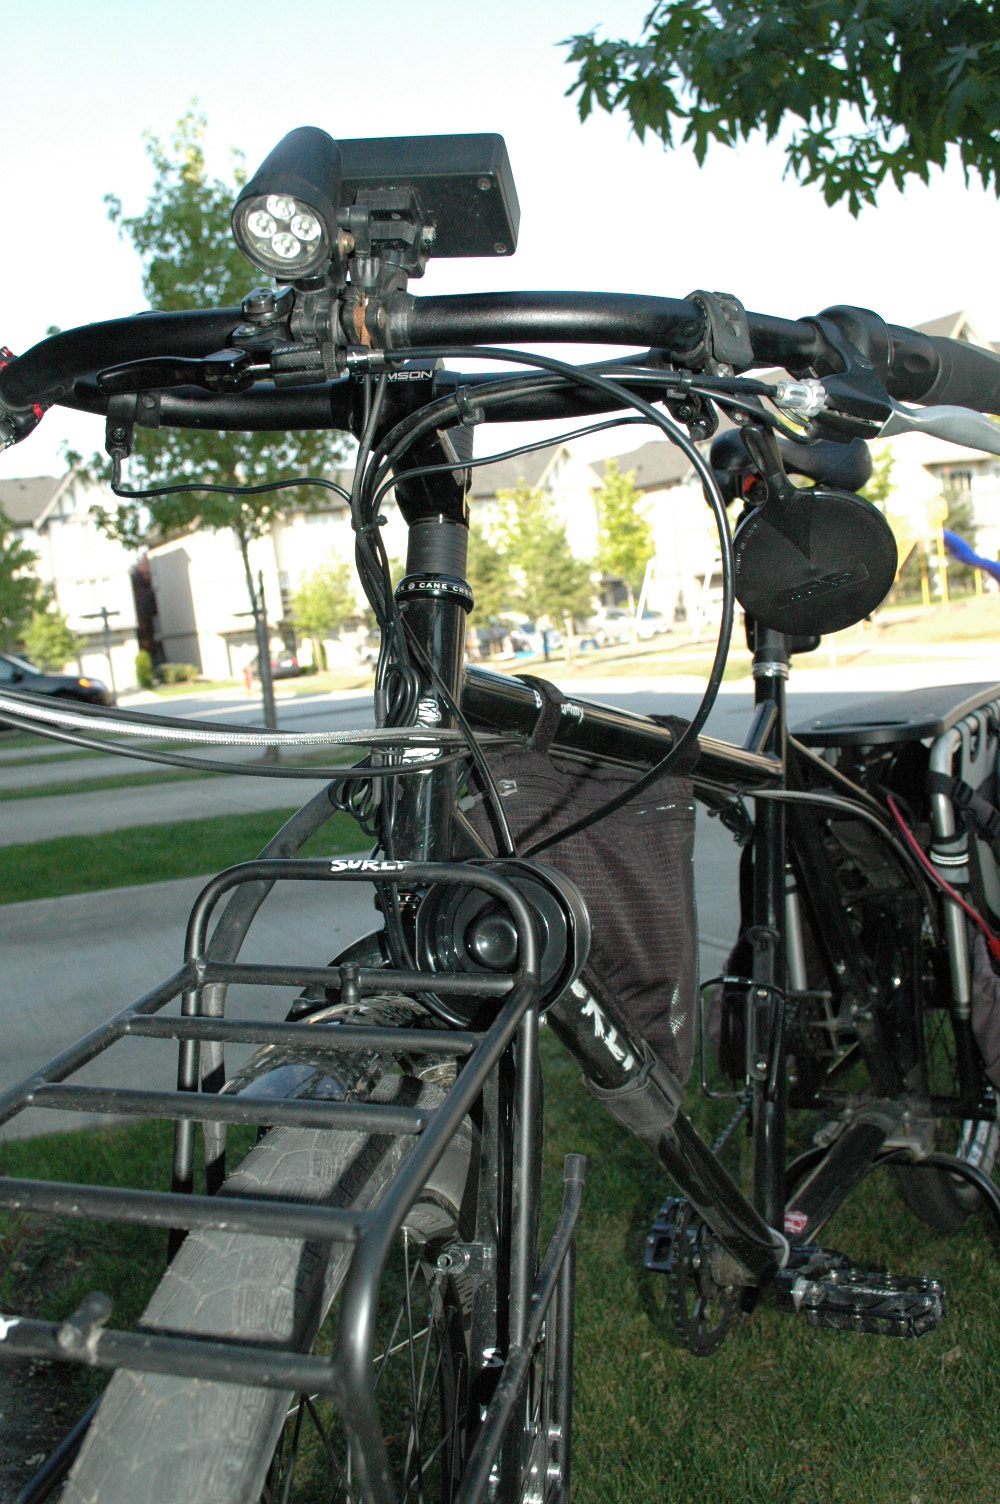
Handle Bars - Jeff Jones Loop Bar with Thompson X4 stem
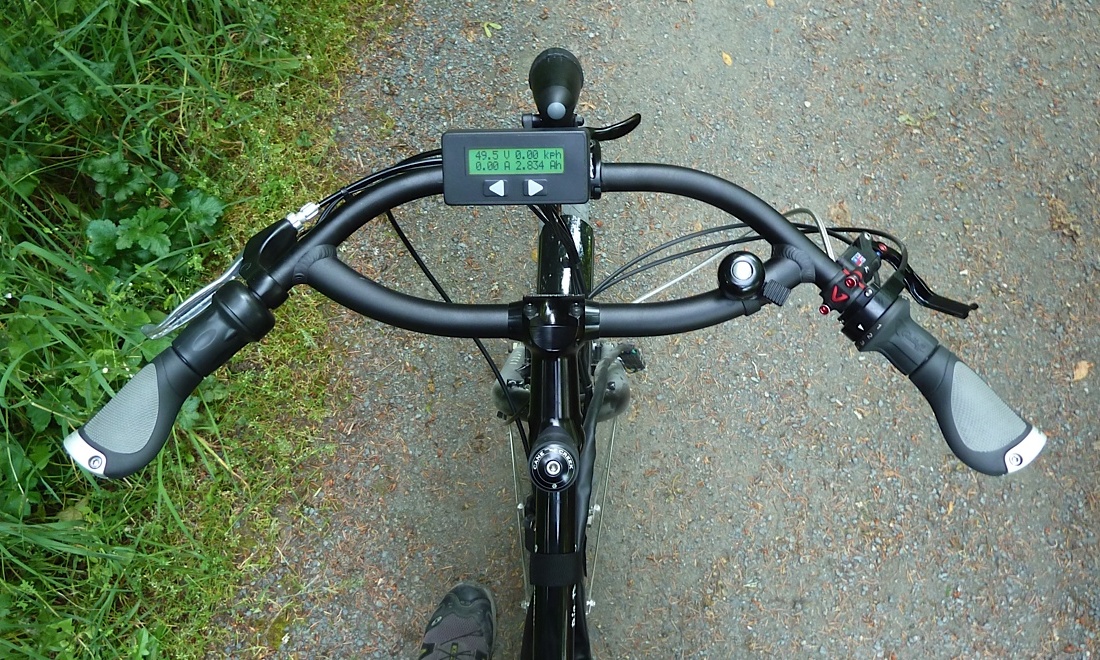
The handle bar is a Jeff Jones loop h-bar which provides a lot of room for all the pieces of an electric bike. On the left handlebar you can see an ergon grip, the electric throttle, and the standard electric bike brake leaver with cutoff/regen switch. On the right handlebar you can see the matching ergon grip, rohloff grip shifter (2nd generation version) and an Ashima hydraulic brake lever. In the center of the loop bar I have the cycle analyst (bicycle computer), 10w 1000 lumen “lumenator” headlight and the deployment lever for the kickstand. The stem is a Thompson X4 as per Jeff’s recommendations for this loop bar.
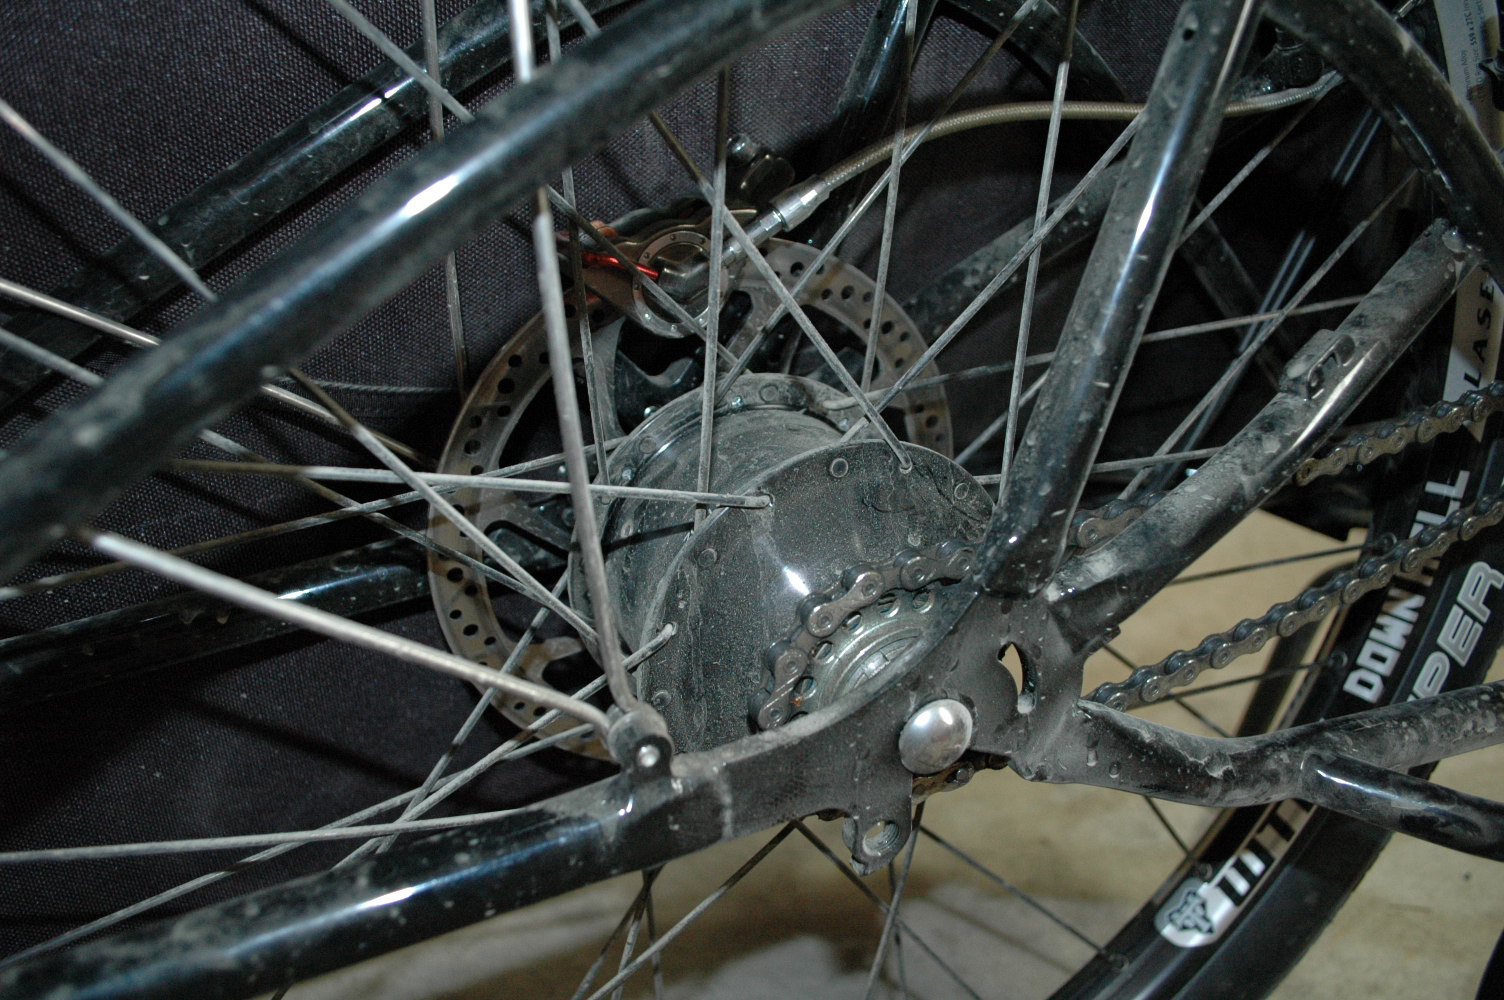
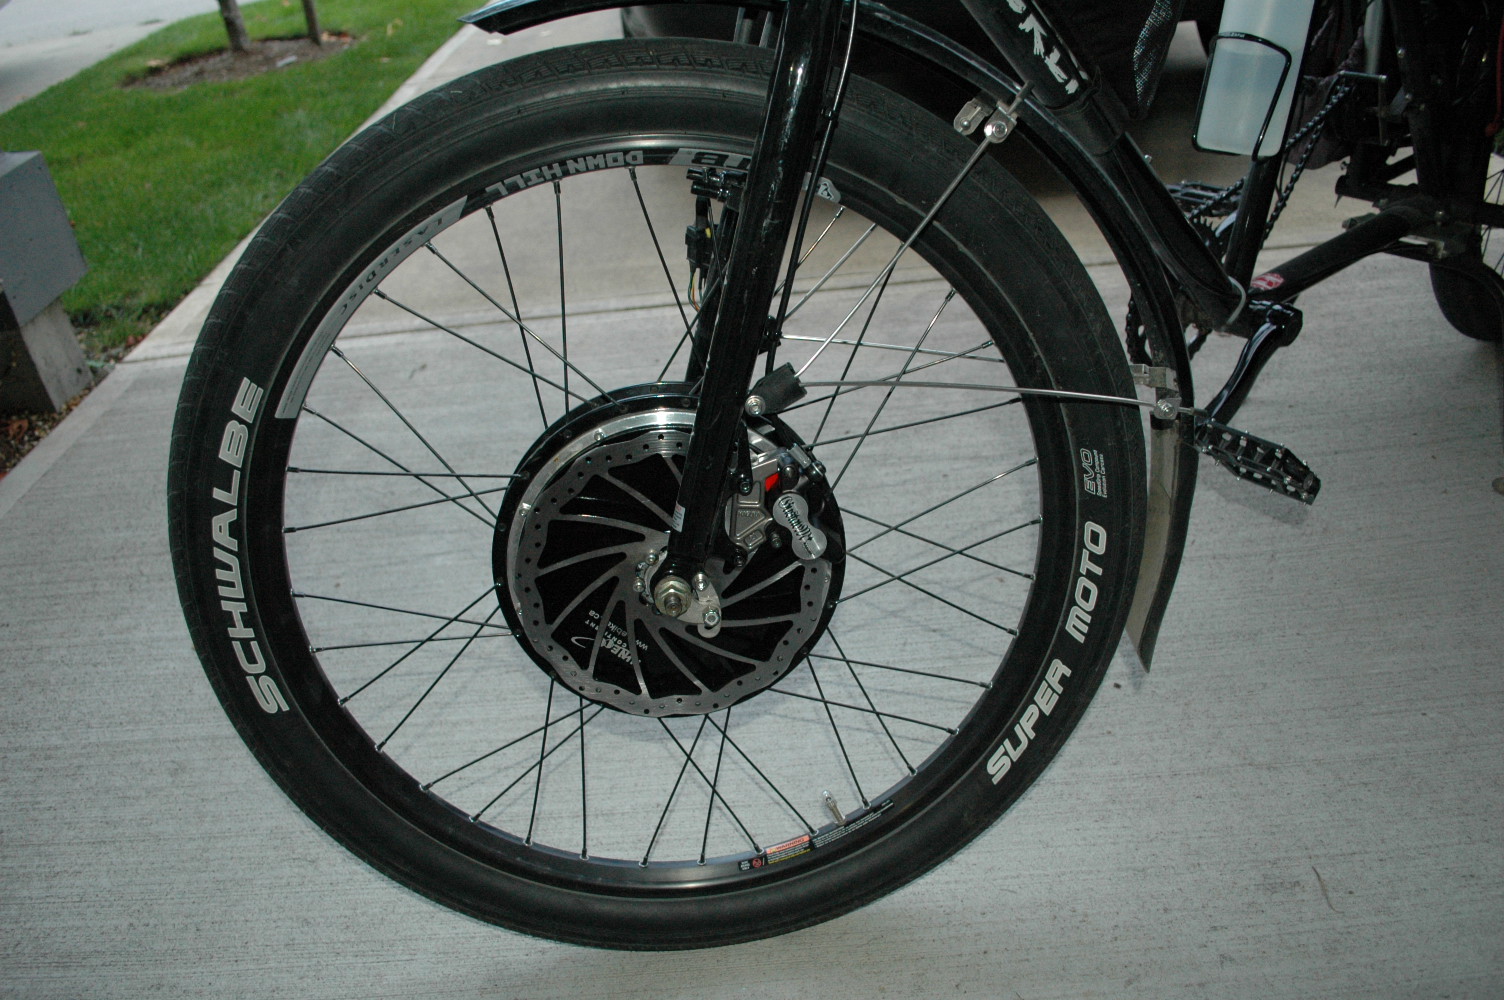
Front Wheel
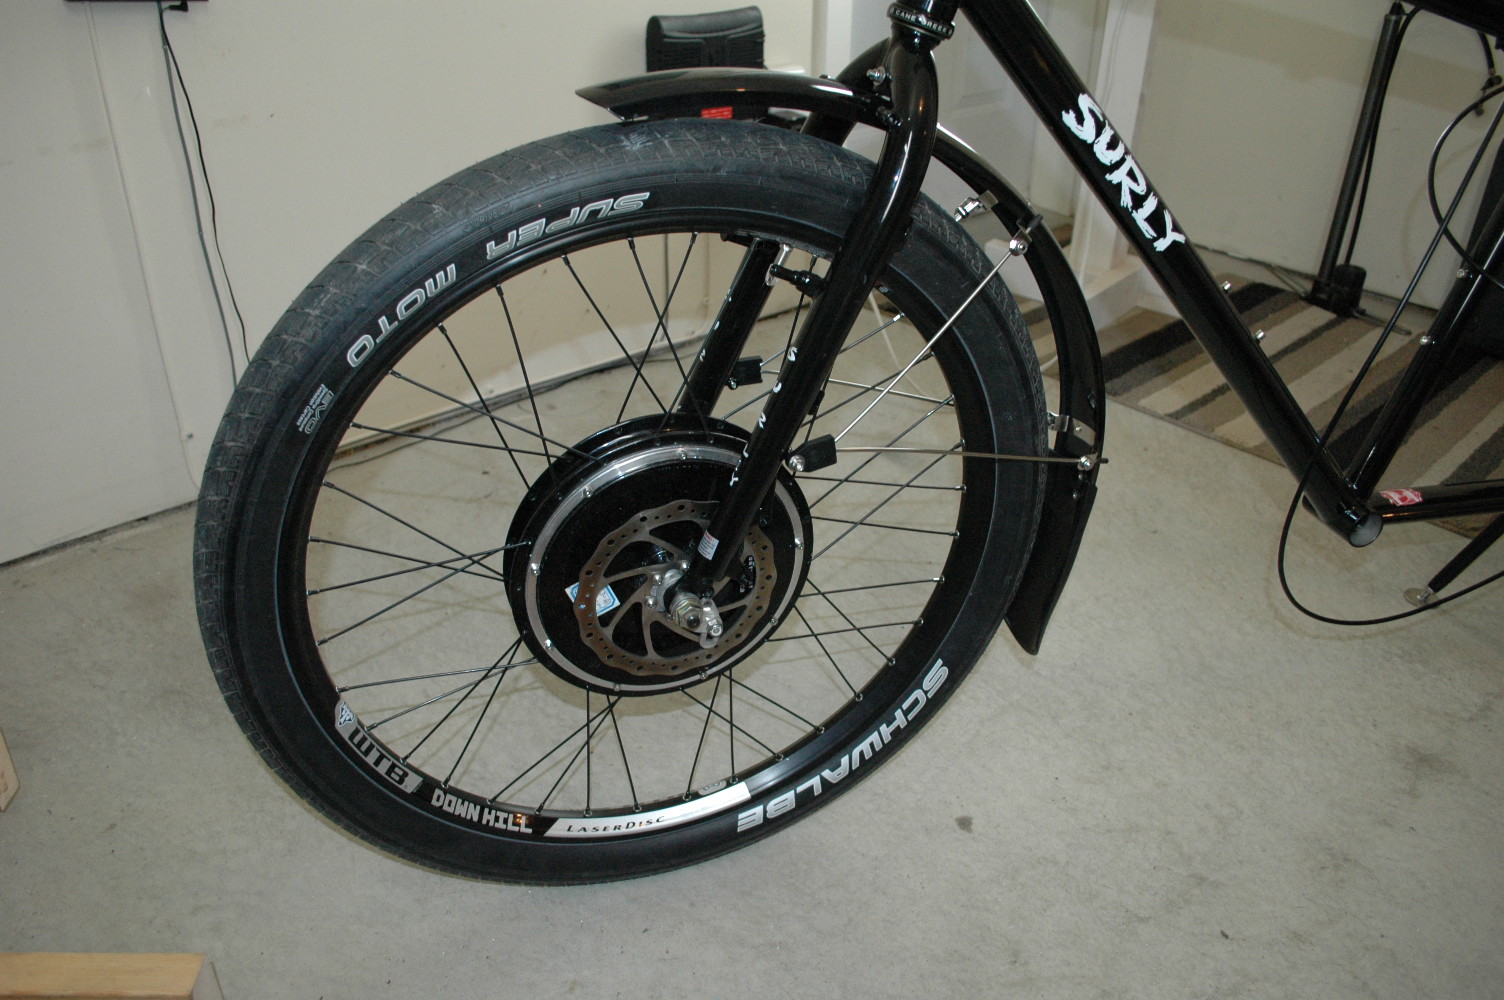
The front wheel is a Nine Continent 2806 electric hub motor spoked into a 26” WTB LaserDisc DH rim with 13G Sapim spokes from Grin Technologies. Very strong wheel and good looking too!
For those of you more familiar with the stokemonkey kit for the BigDummy, this is very similar, except that it doesn’t involve the drivetrain at all. The disadvantage of this setup compared to the stokemonkey is that you can’t use your gearing with the motor. The advantages are that you have a much simpler setup with no chains, brackets, tensionsers or tandem cranks which means lower maintainence, easier installation and no concern for what other bike components you want to choose.
As it is today I have a cheap cable actuated caliper with a 160mm disc rotor. I need to upgrade the front rotor to a 180mm disc with hydraulics, but the current designs for electric hub motors make it difficult to fit most hydraulic brake calipers. I’m working on a solution for this which should be available in the near future for all fellow ebikers to enjoy.
Drivetrain
Surly Mr. Whirley Crankset
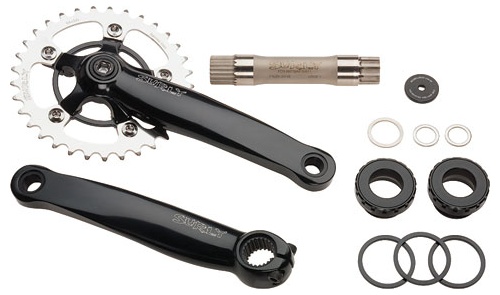
At first I was a little bewildered with the sheer number of cranksets available on the market. I looked at quite a few, but always felt that shops were tyring to push the one they had in stock, rather than the one best for my application. Considering this bike is my “SUV Bike” and not a sports vehicle I wanted strength, reliability and maintainability more than light weight. Of course with a Rohloff internally geared hub I wasn’t interested in many of the double and triple cranks designed for mountain biking either.
The Surly Mr. Whirley is a heavy crank with a steel cromo splined axle. So strength may be its first noticeable quality. With the exception of the bearing cups themselves, every other fastener can be tightened/maintained on the road with a standard bicycle multitool. I also liked that you can change the spider on the cranks for different sizes (I may never need to, but I like to have the option).
You won’t want to use this cranks for a triathlon, but for general outdoor and trail use these are awesome!
KMC X1 “Rohloff Chain”
This chain doesn’t have the play typical of deraileur chains. Meaning it doesn’t tolerate much of an angle between the front and back chain ring. This tighter/stronger construction would cause trouble on a deraileur setup but works excellent with a fixed chain and provides a much longer life.
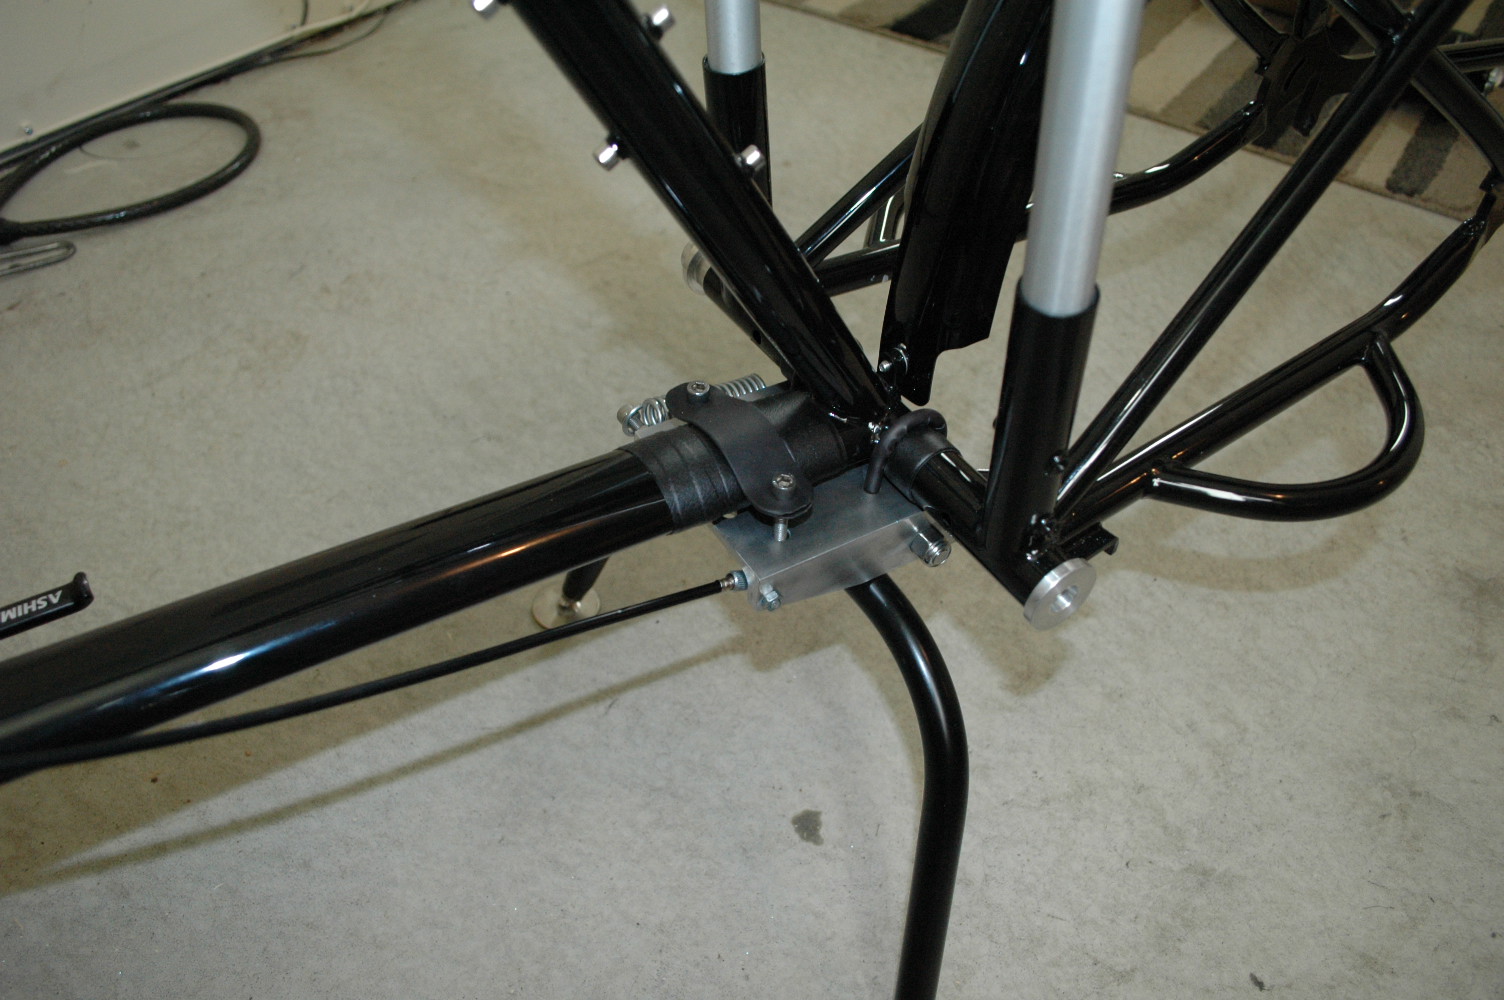
TerraCycle Power and Return Idler Kit for Big Dummy
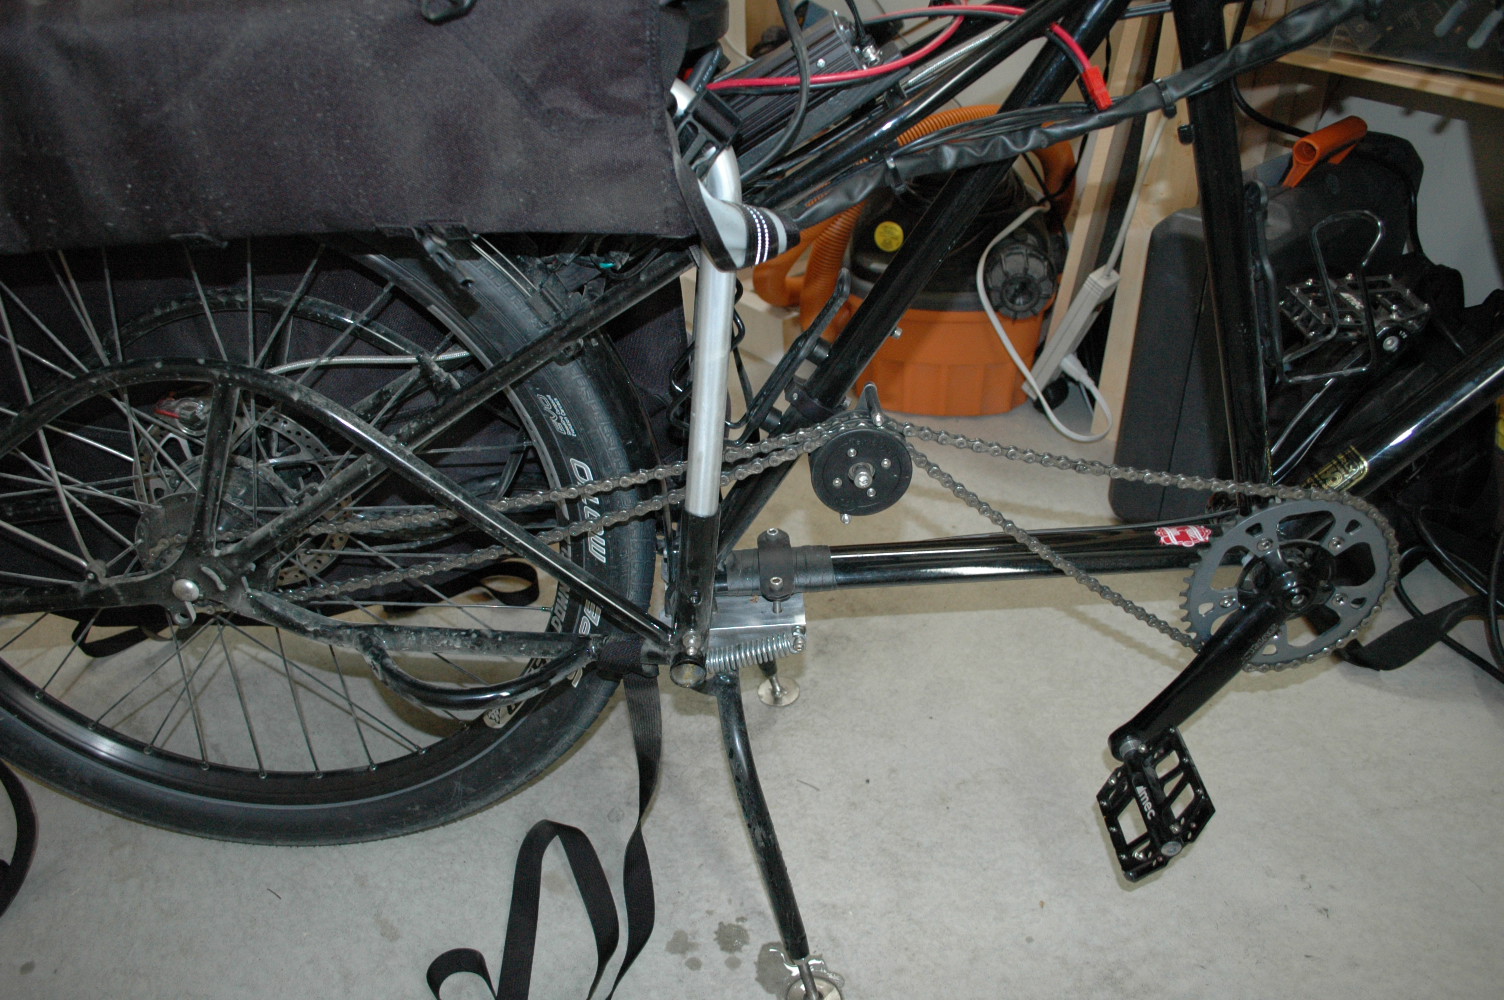
This idler kit does a few excellent things for your longtail bike:
- The chain can now be removed from the bike without splitting it. The entire chain path doesn’t go around any frame features.
- The chain path is raised up quite high. This keeps it cleaner (hypothesis to be tested - but the claim seems somewhat reasonable).
- Allows you to tension the chain for a Rohloff on the Big Dummy (which has vertical dropouts) without the use of a spring style tensioner.
- Both the front and rear chainrings get a high degree of chain wrap. That is the number of teeth engaged on each chainring is relatively high.
Some “cons” to mention:
- Because there is no rear tensioner/derailer, removing and replacing your rear wheel can be a little trickier.
- The design of the water bottle mount braze-ons leave limited room for adjusting the tension of the chain. You really need to have the chain sized just perfectly to get a good fit or use a tensioner in addition to this idler kit.
Rear Wheel
The rear wheel is a Rohloff Speedhub 500/14 spoked into a WTB LaserDisc DH rim using 13G straight gauge sapim spokes. The Rohloff is only available in a 32h pattern. While this is a dishless hub (which claims to compensate for 32h vs. 36h drilling) many people get nervous with a 32 hole wheel when you intend to put a lot of load on it like a utility bike such as the Big Dummy. I believe you have to specify that you want the “tandem” version of the Rohloff for the flange to have been drilled for 13g holes. I had to order a tandem kit anyhow due to the length of the big dummy and therefor the length of the shifter lines I needed.
Stand
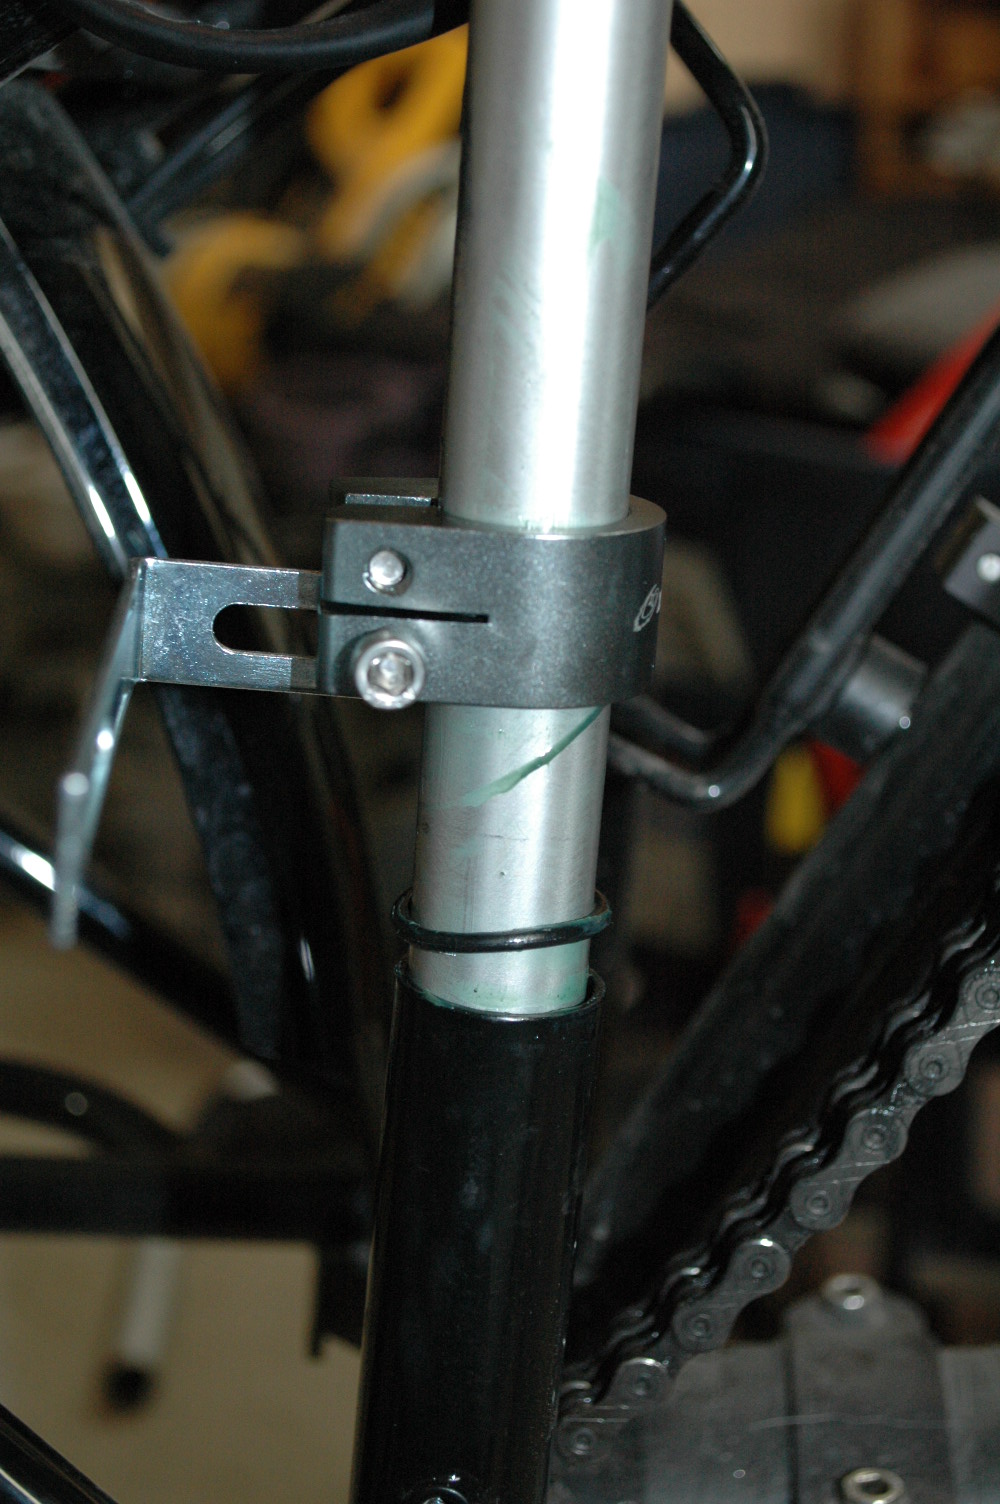
I went with the Rolling Jackass Centerstand from Val Kleitz. While I did give Val a hard time about the price, it is a very well made product that does exactly what I wanted.
I threw some shrink wrap around the mounting bracket and U-bolts to decrease the “bolt-on” look of the stand. I like the black look. I also wrapped the frame with some “Magic Wrap” from Home Depot. This magic wrap is just a rubber tape with NO sticky backing. It stretches around and sticks to itself like seran wrap. I was pleasantly surprised with the result. Its matt black with no sticky feeling on either side and protects the frame from mounting scratches which would later become prone to rust (its a steel frame).
TIP: If you are installing one of these, hold the stand in the “half way” position and you’ll easily be able to disconnect the spring on the brake line coming from the deployment lever. With the deployment line disconnected you’ll have a much easier time gaining access to the nuts on the underside of the stand when mounting it. When you’re done mounting just reconnect your deployment line in the same fashion.
XtraCycle Components
P-Racks with Flight Deck, 2010 Black FreeLoader Bags, WideLoaders
August 2011 Updates
I made a few improvements to the bike since I built it.
Surly Nice Rack Front
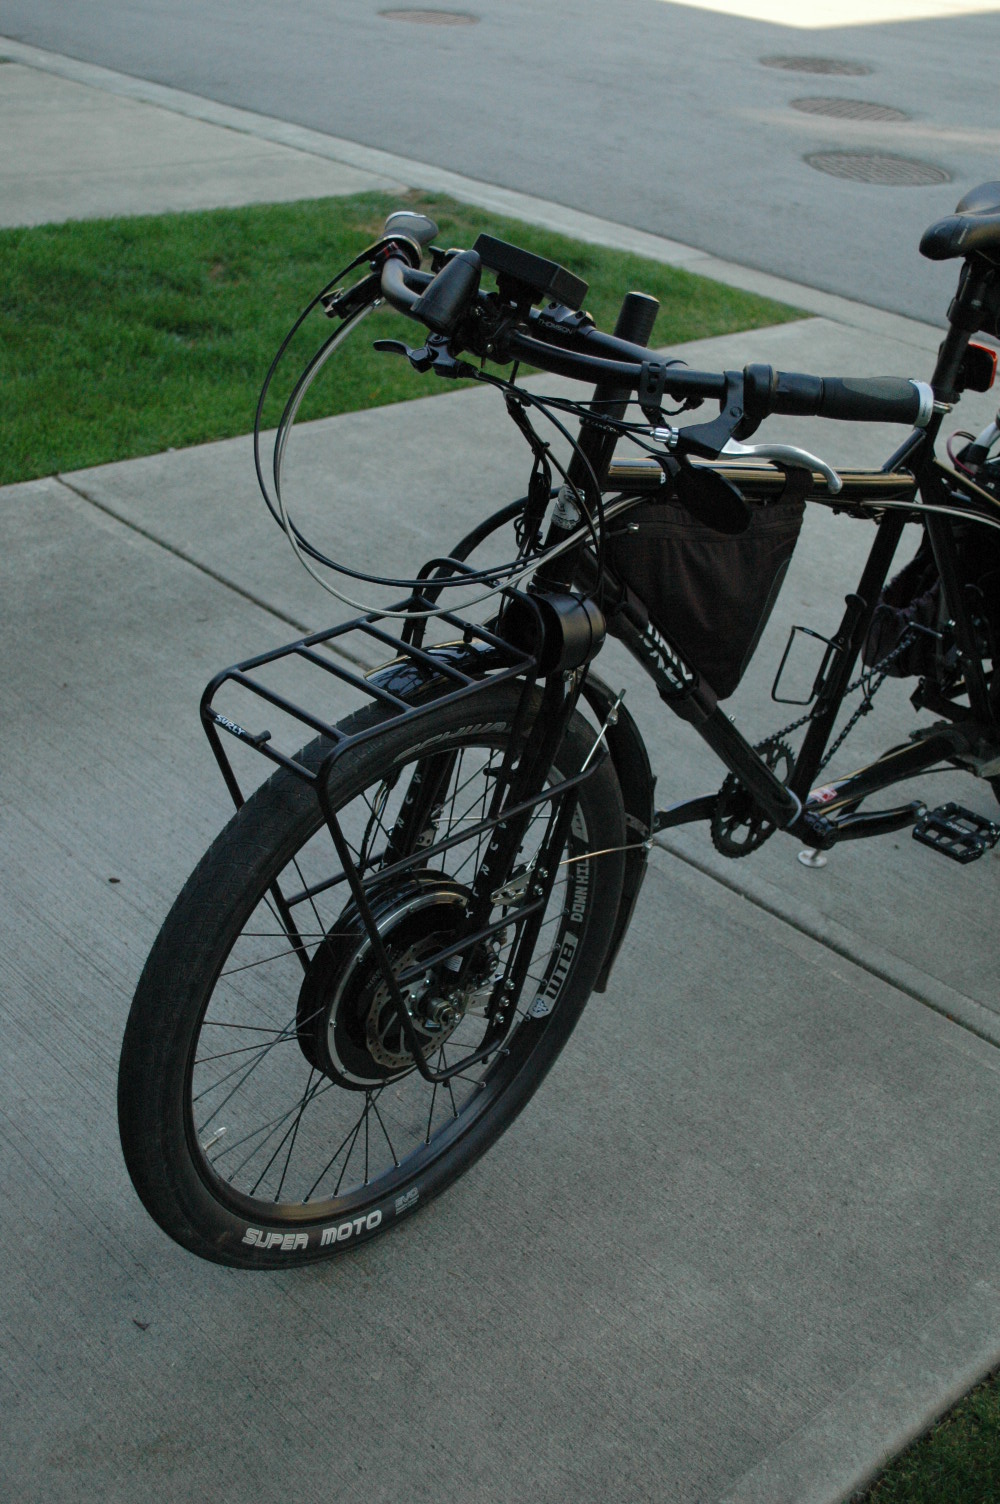
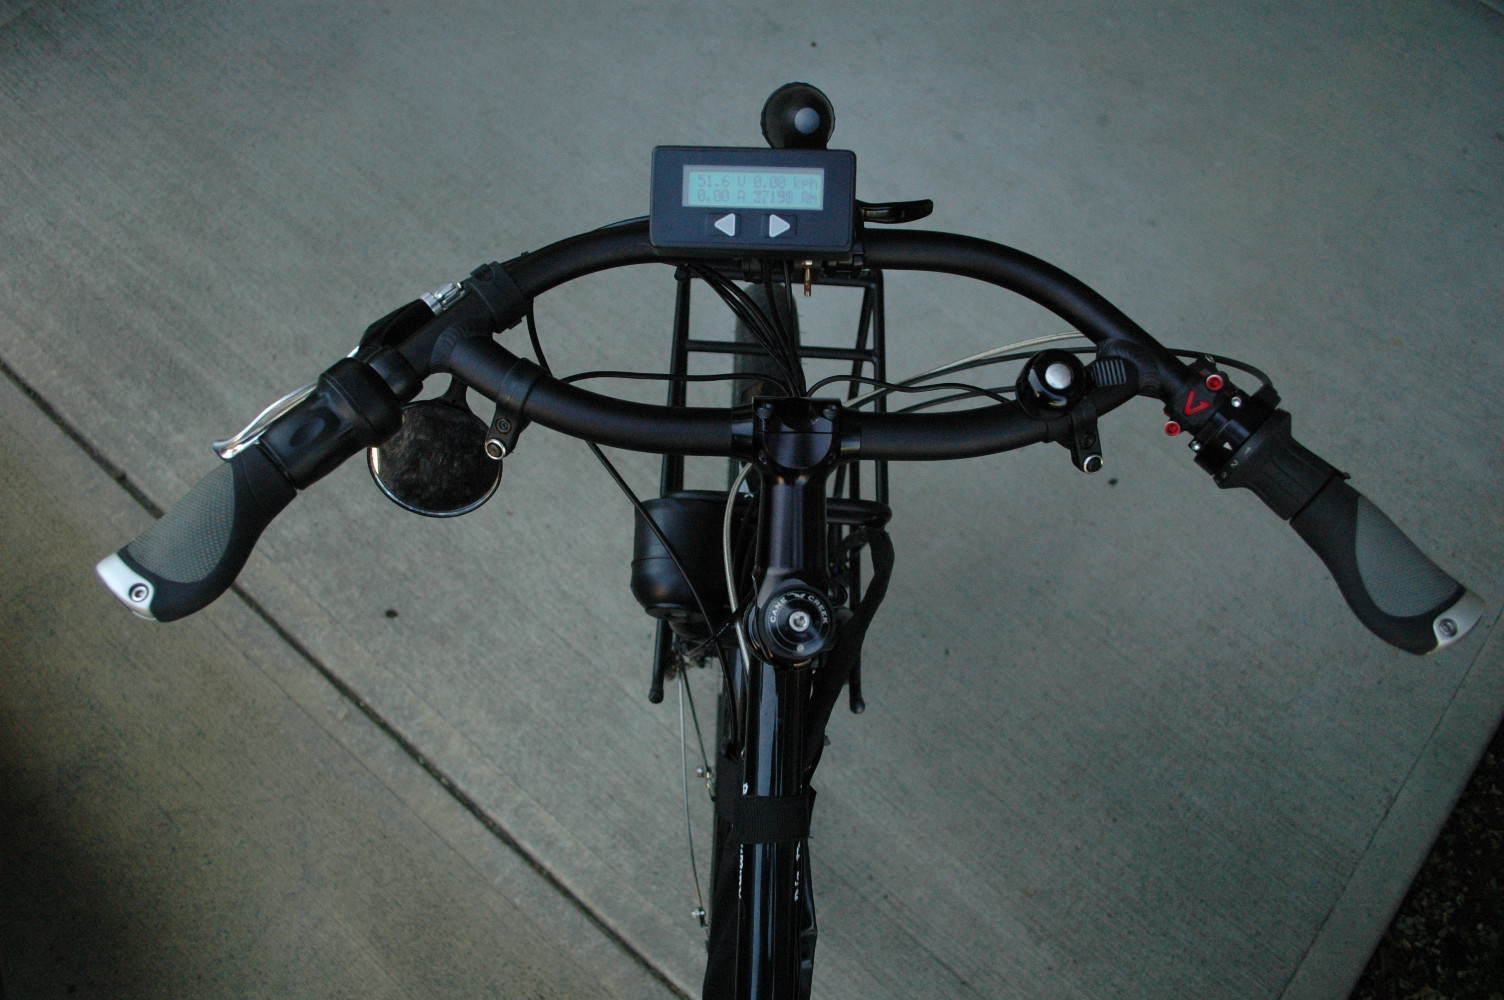
I learned a couple thing while using the bike this summer. One is that the jones loop bars are best enjoyed with more space for multiple hand positions. The front loop is really attractive for those of us who love gadgets, but you really do want some extra hand positions if you are going to do any kind of distance on the Big Dummy. That means I’d like to get the head light and cycle analyst bike computer off the handlebar and somehow mounted underneath.
I also did a couple trips with 40-60 lbs of cargo on the back with some off road paths. The bike did great, but was a little back heavy. This isn’t much of a problem but does interfere with the traction of the front wheel where my electric assist motor is located. I have another trip planned for which I’ll probably have the most gear yet, so I think I might try some panniers up front to balance the bike all around.
As you can see the combination of this two desires was to put a front surly nice rack on the fork. Its quite a sturdy rack and has the unique ability to host the panniers at both a high and low position. Low panniers provide a better (lower) center of gravity, while high panniers will stay cleaner and more out of the way when going off road. I might also consider moving my motor controller for the electric assist to the top of the front rack. This would eliminate some of the wires going along the top tube and make way for a beautiful frame bag on the seat stays from Porcelain Rocket.
BikeTac Galeforce Blaster Horn
Well, I was hit by a truck this summer! Yup, I was in the truck’s blind spot going straight through the intersection on the shoulder. The truck turned right without shoulder checking. I yelled at the driver, but they didn’t hear me in time and came to a stop at a 45-degree angle half way through their turn. Perfectly positioned for me to fly over their hood.
So I thought it was time to get some kind of loud horn. I wanted something loud enough that drivers would hear it over their music in a closed car amongst the noise of surrounding traffic. Considering I am already carrying a good size battery on board, I figured electric is the best way to go. I ended up getting a Galeforce Blaster from BikeTac designs.
XtraCycle 700c Riser Plugs
While the bike is not 700c, I found the spacing of the XtraCycle platform to be a little off. For example you couldn’t use the long-loader with p-racks because the aluminum tube that you hang panniers on was in exactly the position where the long-loader interfaced with the p-rack. That was a little annoying. The 700c spacer allow you to somewhere between 1/3 to a full inch of height to the p-racks. I happen to be picky about getting them all the same height (and potential ratling) and so threw in some nylon washers to fill the extension space. The nylon washer don’t weight hardly anything (the home depot plastic bag weighed more than 20 of these washers).
XtraCycle Whatchamacollars
The XtraCycle platform is very cool for its modularity, but on the other hand this modularity creates more spaces for water to enter your frame. Also this interface between the frame and the p-racks was prone to some squeeking when you ride over a bump as your backend is momentarily weightless. The Whatamacollars fix both of these issues. They have a rubber O-ring inside them to improve water resistance and bolt onto both your frame and your choice of p-rack or v-rack or other XtraCycle accessory.

Inner Tube Upgrade
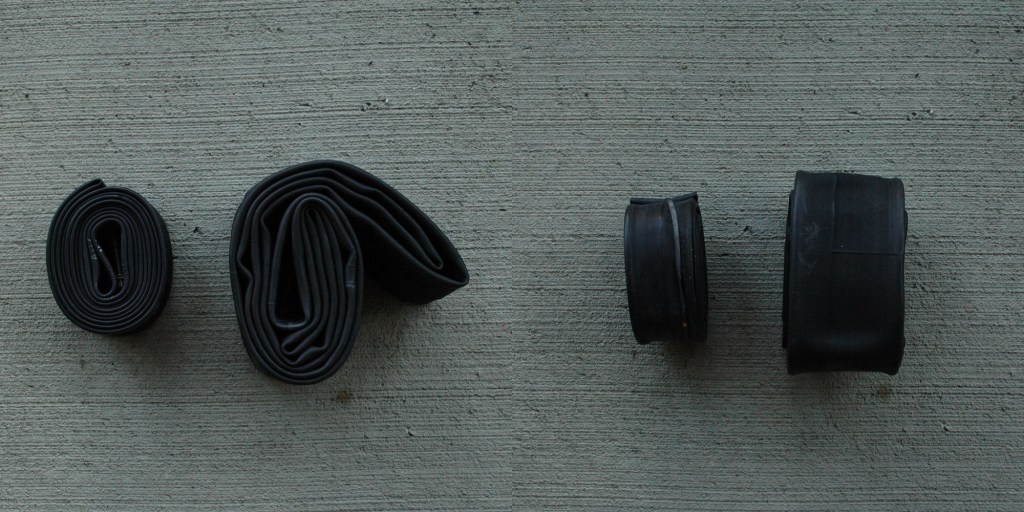
I had been using a relatively cheap average size inner tubes with my 2.35” Super Motos. After getting a few flats (3 this summer) I felt as though the inner tube was being stretched a little far at 2.35” which might have made it more prone to being poked by small bits of glass and such. So I decided to upgrade the back tube to an XC tube which is designed for 2.2”-2.6”. Its thicker rubber and larger volume, so shouldn’t be nearly as stretched when filling the 2.35” Super Motos. We’ll see how it goes, but I’m hoping to reduce the number of flats I get.
As a side note, when I did get flats on the old tube and patched it up, they didn’t always hold well. I presumed that as I pumped it up and the tire expanded so much it would “tear” the patch off the rubber a little. So even if I do get a flat, I’m hoping patching will be easier/more reliable with this larger tube.
September 2011 Updates
My brakes have been lacking for this bike from the start. I reused some brakes I already had to save money on the initial build.
Magura Gustav Disc Brakes

The magura Gustav disc brakes look awesome! The 210mm rotor on the front is really nice and very appropriate for a utility bike like the Surly BigDummy. Because of a bunch of mix ups when ordering the brakes I don’t have all the parts to outfit the whole bike yet. One of the vendors I ordered from sent me mashup of parts that didn’t really add up. They provided a partial refund for the error but I still have to find a few more part or order another brake set.
Once I get it all together I’ll have the Gustav on the rear as well with my Rohloff! I’m really looking forward to having this all tidy’d up as my handle bars a little frankenstein inspired at the moment with 4 brake levers and and a whole mess of tubes and wires.
Magura Gustav Rotor Clearance On Nine Continent
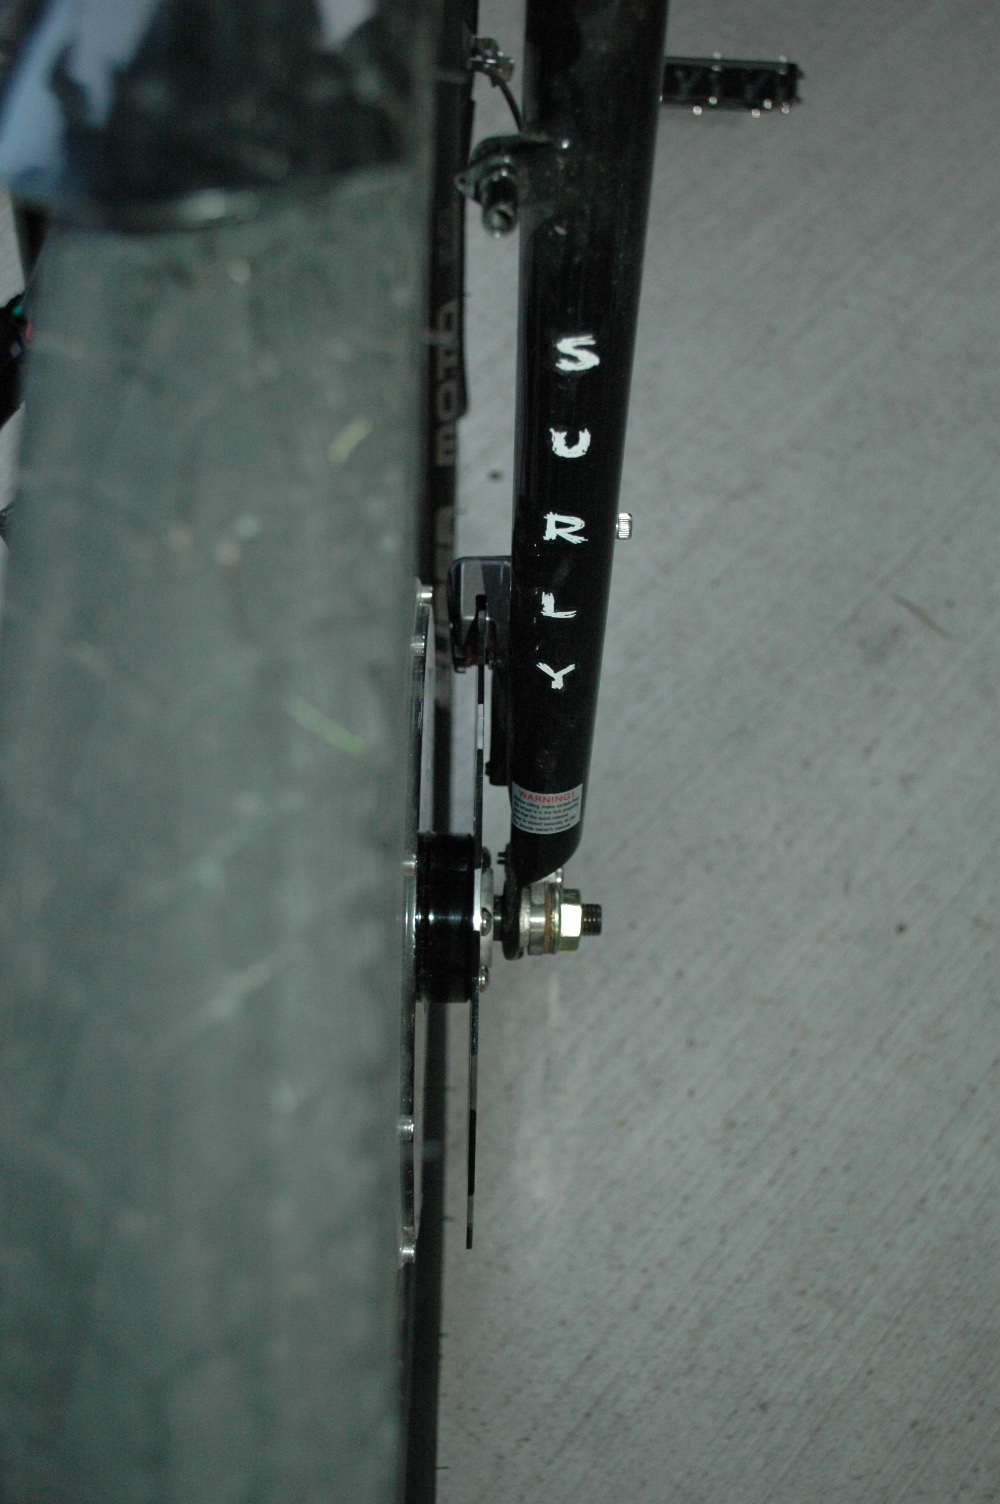
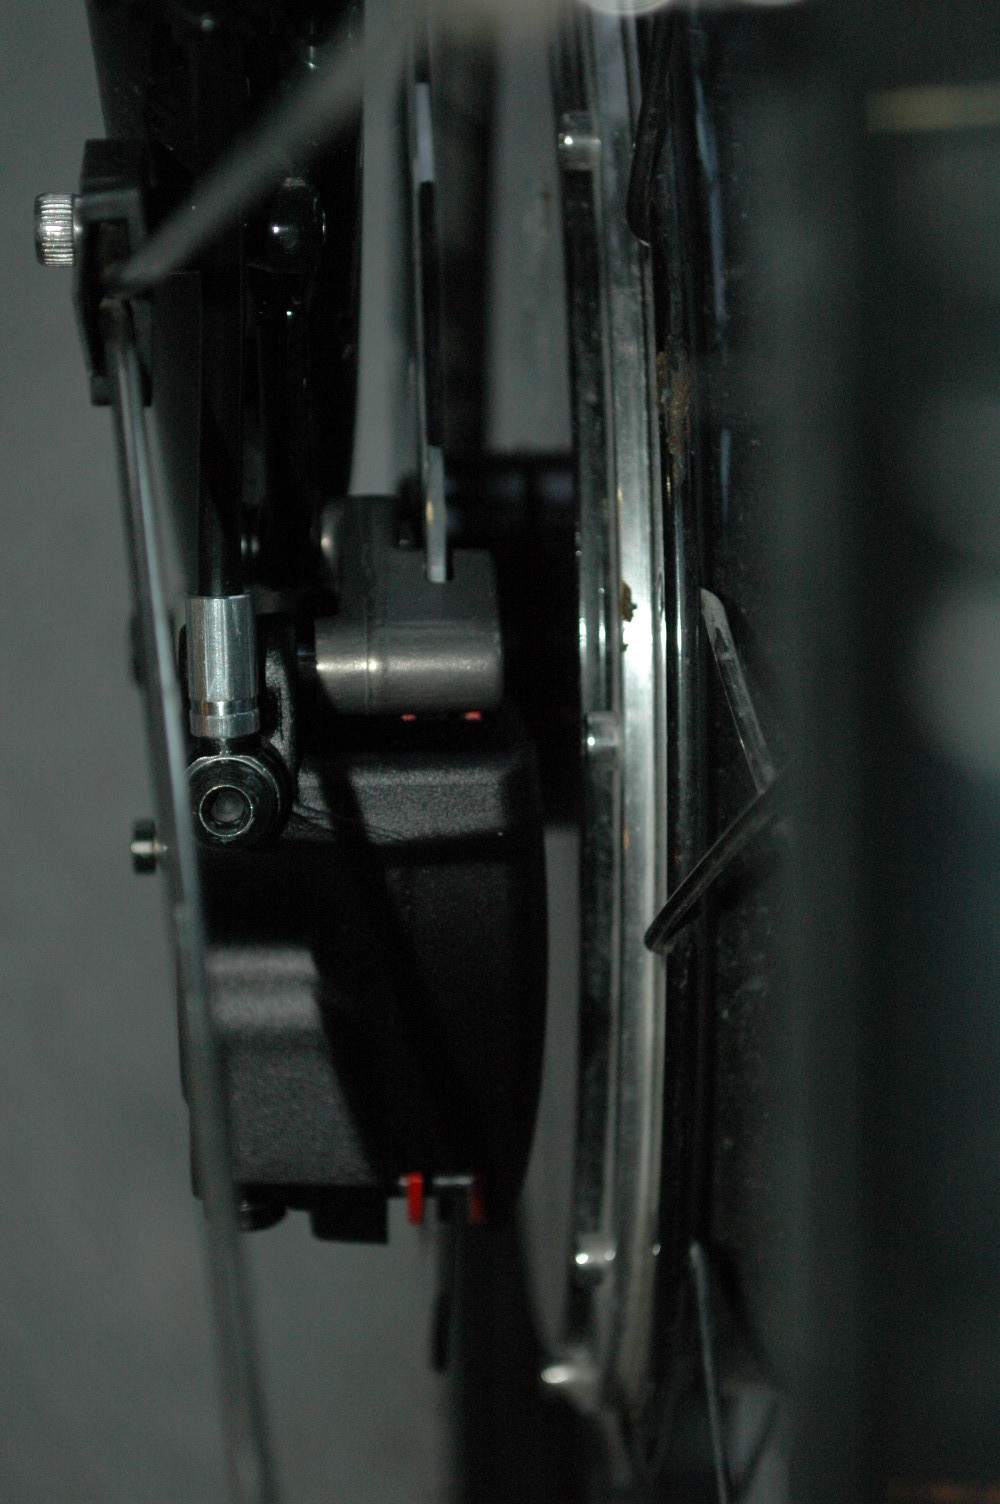
The Nine Continent electric hub motors claim disc brake compatability; however, there isn’t a lot of room between the disc rotor and the hub motor surface. This means you can’t just pickup any disc brake at your local bike store which is a little annoying. Many people spend a fair bit of time trying to find a brake that fits nicely. So I thought I’d post photos of the clearances for the Magura Gustav Caliper on the Nine Continent hub motor. It fits very nicely!
The design of the Gustav is a floating caliper with the pistons on only one side. So as the pistons clamp the disc (from one side) the whole caliper can float back and forth on the caliper mount. This is much like some motorcycle brakes. The result is a very strong, low profile brake - but with a little extra weight (we’re talking grams here people).